Techies Corner
#XploreMore on Tech updates, tweaks, news ...
Don't miss any tech updates! Follow us on Facebook... :-)
. #NameitUnique


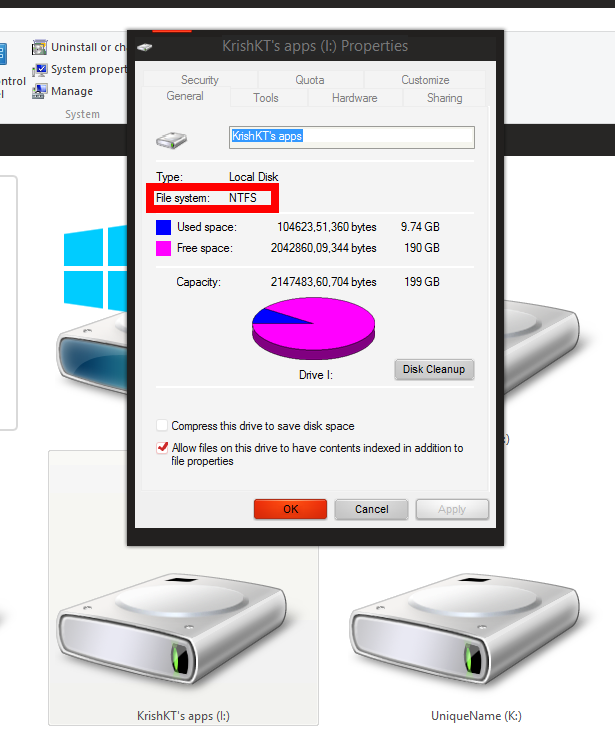
>> Open File Explorer window. Right-click the drive where you want to install Windows 8 apps – whether it’s an SD card, hard drive, or whatever else – and select Properties --> Ensure that the drive is set as NTFS file system.
Warning:
>> If the drive isn’t selected as NTFS file system, you will need to format the drive as NTFS to continue. (Many SD cards are formatted with the FAT file system instead.)
>> Back up any important data from the drive before continuing – formatting will delete all data on the drive. Right-click the drive and select Format.
>> Take registry and system backup before making below changes...
>> Format the selected drive, say 'D:\'
>>After format, create a folder for the apps on the drive ('D:\'), such as WindowsApps or Windows8Apps.
>> Open the registry editor.
>> Navigate to the HKEY_LOCAL_MACHINE\SOFTWARE\Microsoft\Windows\CurrentVersion\Appx key
>> Select the Appx key, click Edit --> Permissions. (Ensure the Appx key is selected or you’ll modify permissions for another key instead!)
>> Click the Advanced button and click the change link next to TrustedInstaller.
>> Type Administrators into the box, click Check Names, and click OK. This will give all administrators on the computer ownership of the registry key.
>> Enable the Replace owner on subcontainers and objects checkbox and click OK.
>> Select Administrators in the Permissions for AppX window and click the Allow option next to Full Control. Click OK and you will now be able to edit the appropriate registry setting.
>> Double-click the PackageRoot value in the right pane and enter the location of the folder you created earlier. That’s 'D:\Windows8Apps\ in the case of our example.
>> Reboot your computer. Your changes won’t take effect until you reboot.
Note:This will only work for apps you install in the future. Previously installed apps will remain at the old location. To move these apps to the new location, you can try uninstall them from your computer and then reinstall them from the Windows Store.
ref.
>> "The launch of the first Ubuntu smartphones_Aquaris E4.5 Ubuntu Edition envisioned the OS for basic tasks like phone, SMS, Web, and email.

>> Its been revealed the Aquaris E4.5, with a 4.5-inch screen and the Scopes mobile UI, which presents digital life services (music, social, Web, photos, etc.) on the home screen.
>> The device has 8GB of storage, a 5-megapixel front camera and 8-megapixel rear shooter with autofocus and dual flash, as well as full HD for super-sharp video.
>> It also features a MediaTek quad-core Cortex A7 processor running at up to 1.3GHz and 1GB of RAM. It's a dual-SIM device and comes unlocked for use on any network.
>> European customers will be the first to get their hands on an Ubuntu phone. Good luck!
ref.
Turn off "The add-on is ready for use" message in Internet Explorer web browser. Once you disable this message, IE will automatically activate newly installed add-ons and will never show you any notification message.

If you install a new add-on or a new software in Windows and if the software automatically adds a toolbar or Explorer bar in Internet Explorer web browser, you get a popup notification message in Internet Explorer that "The 'xx' add-on from 'xx' is ready for use". You get two buttons "Enable" and "Don't enable". If you click on "Enable" button, the add-on is activated immediately. If you click on "Don't enable" button, the add-on is disabled by Internet Explorer.
If more than one add-ons were installed by the software, Internet Explorer shows "Several add-ons are ready for use" popup notification message. If you click on "Enable" button, Internet Explorer shows a new window showing a list of all newly installed add-ons. Here you can enable or disable desired add-ons.
Recommendation: Take Registry Backup prior making below changes (Registry Editor -> File -> Export)
>> Open Registry Editor
>> Navigate to HKEY_LOCAL_MACHINE\SOFTWARE\Microsoft\Windows\CurrentVersion\Policies\
>> Create a new key under Policies key and set its name to Ext
>> Now right click on the new Ext key and, create a new DWORD value name IgnoreFrameApprovalCheck and set its value to 1
>> If have 64-bit edition of Windows, you'll also need to create above key and DWORD value in below location:
HKEY_LOCAL_MACHINE\SOFTWARE\Wow6432Node\Microsoft\Windows\CurrentVersion\Policies\
ref.

Note: Remember, trying out an early build like this can be risky. So it's recommended that you don't install the preview on your primary home or business PC. Unexpected PC crashes could damage or even delete your files, so you should back up everything.
Steps to follow:
>> Downloaded a Windows Insider Programvfrom Microsoft to prepare your Windows 7 or Windows 8 operating system for the upgrade. (It requires a restart of the PC so that the changes it made take effect. The device will boot into the current operating system after restart.)
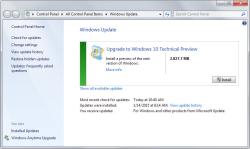
>> Open Windows Update console on your PC.
>> Click on the check for updates button. It may take a while for the check to complete. Initiate the Windows 10 update from install button.
Important notes:
> Create a backup of your important files and data before you proceed with the update.
> If you are running a 32-bit version of Windows, you cannot upgrade to 64-bit versions of Windows 10.
Steps to follow:
>> Downloaded a Windows Insider Programvfrom Microsoft to prepare your Windows 7 or Windows 8 operating system for the upgrade. (It requires a restart of the PC so that the changes it made take effect. The device will boot into the current operating system after restart.)
>> Open Windows Update console on your PC.
>> Click on the check for updates button. It may take a while for the check to complete. Initiate the Windows 10 update from install button.
Important notes:
> Create a backup of your important files and data before you proceed with the update.
> If you are running a 32-bit version of Windows, you cannot upgrade to 64-bit versions of Windows 10.
ref.
| Free forum by Nabble | Edit this page |