Techies Corner
#XploreMore on Tech updates, tweaks, news ...
Don't miss any tech updates! Follow us on Facebook... :-)
. #NameitUnique
Here’s how to do it!
• On an iPhone, iPad, or Samsung Galaxy: Press the Home button and the Sleep button simultaneously.
• On other Android phones: Press the Home button and the Volume Down button simultaneously.
ref.
• On an iPhone, iPad, or Samsung Galaxy: Press the Home button and the Sleep button simultaneously.
• On other Android phones: Press the Home button and the Volume Down button simultaneously.
ref.
>> Open the “Run” dialog box by pressing the 'Windows key + R' key combination and type shell:startup -- click OK
>> In the window that appears, copy and paste the shortcut of the program to get launch at Windows startup
>> In the window that appears, copy and paste the shortcut of the program to get launch at Windows startup
>> Use search filters
*Search by file size
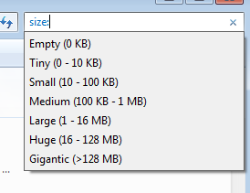
You can use size: > 100 to search for files larger than size 100 KB, append a unit and you can search for file larger than 100 MB like so – size: >100MB. In addition to this, you can also use size: medium, size: large and other such operators to fine tune your search.
*Search file by kind
What if you want to search within all documents that is doc, docx, xls, pdf and the like? Well you use the kind: operator. Use kind:doc to search within documents, kind:contacts to search for contacts and kind:E-mail to search within emails. You can find the complete list by typing kind: in the search box.
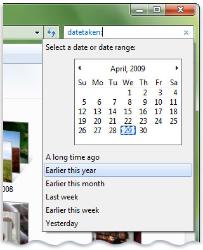
*Search by Date taken:
>> Use quotes for exact matches
As you would do with a Google query, you enclose your query within quotes to find an exact match. As an example, if you search for uniquename, the search will return items that contain make, use and of anywhere in any order. On the other hand, if you enclose these terms within quotes then search will return items having the exact phrase unique name. (e.g.) "unique name" in search box.
>> Using keywords to refine a search
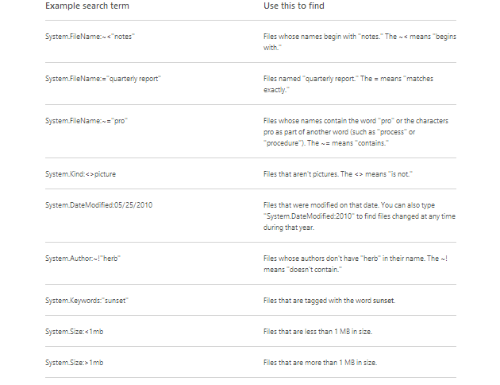
If you want to filter on a property that doesn't appear when you click in the search box, you can use special keywords. This typically involves typing a property name followed by a colon, sometimes an operator, and then a value. The keywords aren't case sensitive.
>> Search using operators
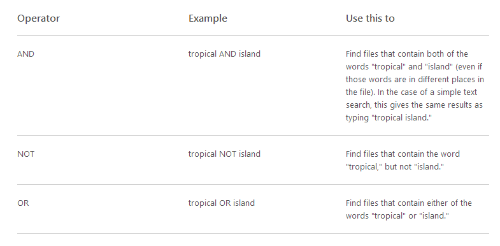
When you use these operators, you need to type them in all capital letters.
*Search by file size

You can use size: > 100 to search for files larger than size 100 KB, append a unit and you can search for file larger than 100 MB like so – size: >100MB. In addition to this, you can also use size: medium, size: large and other such operators to fine tune your search.
*Search file by kind
What if you want to search within all documents that is doc, docx, xls, pdf and the like? Well you use the kind: operator. Use kind:doc to search within documents, kind:contacts to search for contacts and kind:E-mail to search within emails. You can find the complete list by typing kind: in the search box.
*Search by Date taken:

>> Use quotes for exact matches
As you would do with a Google query, you enclose your query within quotes to find an exact match. As an example, if you search for uniquename, the search will return items that contain make, use and of anywhere in any order. On the other hand, if you enclose these terms within quotes then search will return items having the exact phrase unique name. (e.g.) "unique name" in search box.
>> Using keywords to refine a search
If you want to filter on a property that doesn't appear when you click in the search box, you can use special keywords. This typically involves typing a property name followed by a colon, sometimes an operator, and then a value. The keywords aren't case sensitive.

>> Search using operators
When you use these operators, you need to type them in all capital letters.

ref.
>> Facebook is changing the way it deals with the user accounts of those that have died. Until now, Facebook memorialized the account held by the deceased (Memorialized accounts are a way for people on Facebook to remember and celebrate those who've passed away.), making it viewable but not editable in any way. Now, users have two distinct options from which to choose.
>> You can choose to
a) have your account permanently deleted after you die, or
b) nominate a “legacy contact” who will be able to manage your account after you have shuffled off this mortal coil. Your Facebook heir will only have access to certain information and settings.
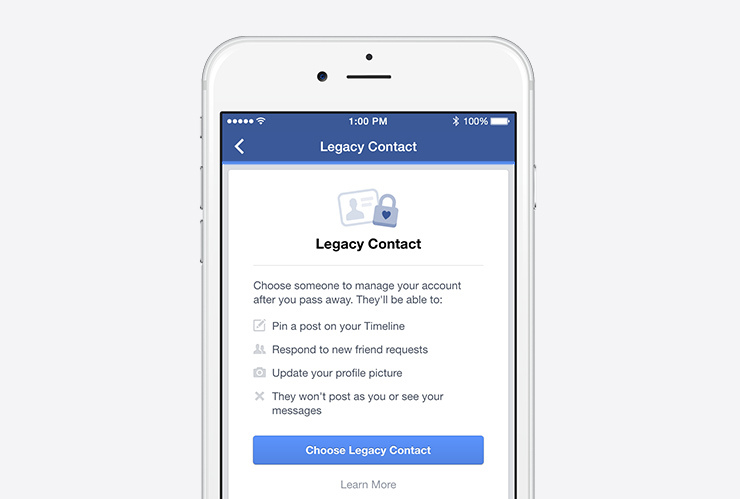
>> This new feature that lets people choose a legacy contact—a family member or friend who can manage their account when they pass away. Once someone lets fb know that a person has passed away, fb will memorialize the account and the legacy contact will be able to:
* Write a post to display at the top of the memorialized Timeline (for example, to announce a memorial service or share a special message)
* Respond to new friend requests from family members and friends who were not yet connected on Facebook
* Update the profile picture and cover photo
>> If someone chooses, they may give their legacy contact permission to download an archive of the photos, posts and profile information they shared on Facebook. Other settings will remain the same as before the account was memorialized. The legacy contact will not be able to log in as the person who passed away or see that person’s private messages.
>> Alternatively, people can let fb know if they’d prefer to have their Facebook account permanently deleted after death.
**To setup a legacy contact:
>> Open your Settings. Choose Security and then Legacy Contact at the bottom of the page.
Note: Facebook is introducing this legacy contacts in the US first and look forward to expanding to more countries. Setting up a legacy contact is completely optional.
>> You can choose to
a) have your account permanently deleted after you die, or
b) nominate a “legacy contact” who will be able to manage your account after you have shuffled off this mortal coil. Your Facebook heir will only have access to certain information and settings.

>> This new feature that lets people choose a legacy contact—a family member or friend who can manage their account when they pass away. Once someone lets fb know that a person has passed away, fb will memorialize the account and the legacy contact will be able to:
* Write a post to display at the top of the memorialized Timeline (for example, to announce a memorial service or share a special message)
* Respond to new friend requests from family members and friends who were not yet connected on Facebook
* Update the profile picture and cover photo
>> If someone chooses, they may give their legacy contact permission to download an archive of the photos, posts and profile information they shared on Facebook. Other settings will remain the same as before the account was memorialized. The legacy contact will not be able to log in as the person who passed away or see that person’s private messages.
>> Alternatively, people can let fb know if they’d prefer to have their Facebook account permanently deleted after death.
**To setup a legacy contact:
>> Open your Settings. Choose Security and then Legacy Contact at the bottom of the page.
Note: Facebook is introducing this legacy contacts in the US first and look forward to expanding to more countries. Setting up a legacy contact is completely optional.
ref.
| Free forum by Nabble | Edit this page |

